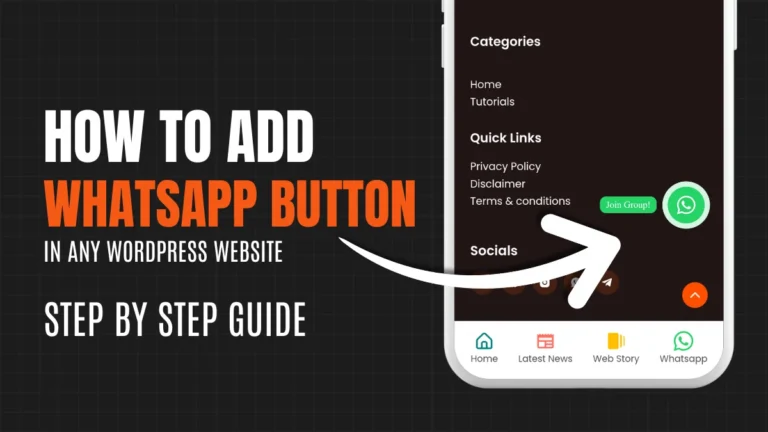
How to Create a Sticky Bottom Menu Bar for Your WordPress Site
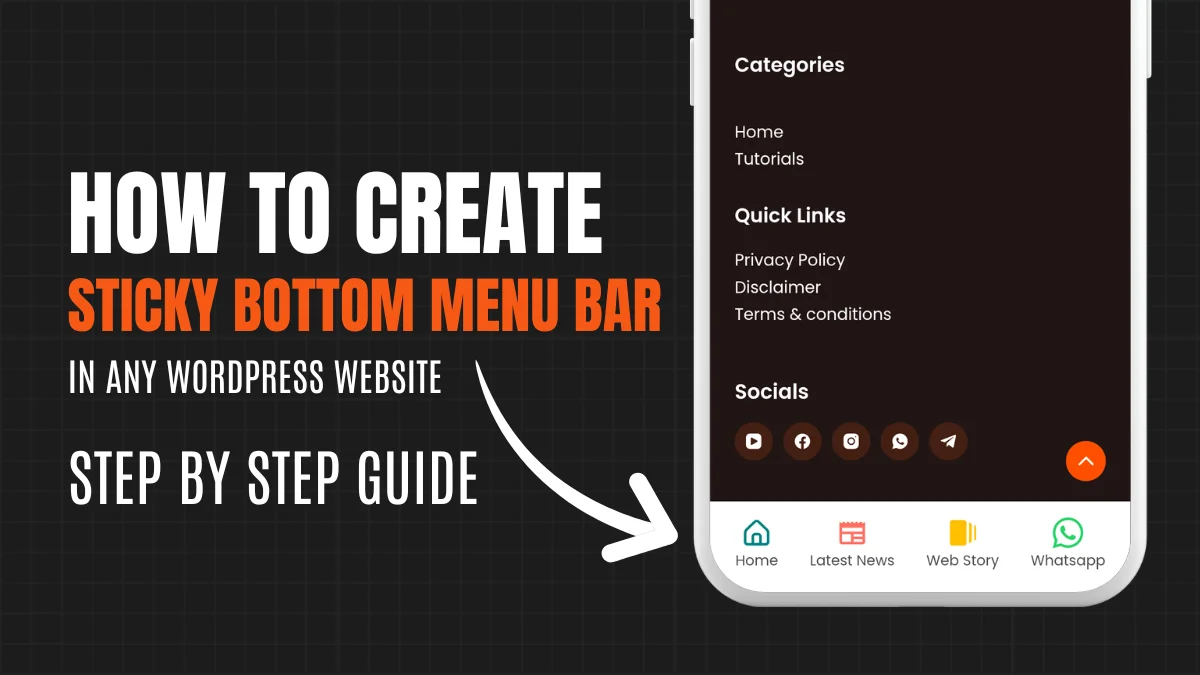
Hello everyone, welcome to the new blog! Today, we will see how to implement a Sticky Bottom Menu Bar on any WordPress website using simple HTML & CSS code. Don’t worry—you don’t need any coding knowledge for this, With this easy guide, you can create an attractive Sticky Bottom Menu Bar that will catch your visitors’ attention.
Adding a Sticky Bottom Menu Bar ensures that your important links are always within reach, making navigation quick and easy for visitors. So, let’s see how we can implement it.
HTML and CSS for the Sticky Bottom Menu Bar
To implement the Sticky Bottom Menu Bar, I have provided the HTML and CSS code below. Please find a step-by-step guide on how and where to add these codes. Just copy the code one by one and follow the guide.
HTML Code:
<div class="bottom-menu-bar">
      <a href="">
        <svg
          class="menu-icon"
          xmlns="http://www.w3.org/2000/svg"
          viewBox="0 0 24 24"
        >
          <g
            fill="none"
            stroke="#008080"
            stroke-linecap="round"
            stroke-linejoin="round"
            stroke-width="2"
          >
            <path
              d="M21 19v-6.733a4 4 0 0 0-1.245-2.9L13.378 3.31a2 2 0 0 0-2.755 0L4.245 9.367A4 4 0 0 0 3 12.267V19a2 2 0 0 0 2 2h14a2 2 0 0 0 2-2"
            />
            <path d="M9 15a2 2 0 0 1 2-2h2a2 2 0 0 1 2 2v6H9z" />
          </g>
        </svg>
        <span>Home</span>
      </a>

      <a href="">
        <svg xmlns="http://www.w3.org/2000/svg" viewBox="0 0 24 24">
          <path
            fill="#ff6f61"
            d="m21.15 3.85l-.82.82l-.95-.96c-.39-.39-1.02-.39-1.42 0l-.96.96l-.96-.96c-.39-.39-1.03-.39-1.42 0l-.95.96l-.96-.96a.996.996 0 0 0-1.41 0l-.96.96l-.96-.96c-.39-.39-1.02-.39-1.42 0L7 4.67l-.96-.96c-.39-.39-1.03-.39-1.42 0l-.95.96l-.82-.82a.5.5 0 0 0-.85.36V19c0 1.1.9 2 2 2h16c1.1 0 2-.9 2-2V4.21a.5.5 0 0 0-.85-.36M11 19H4v-6h7zm9 0h-7v-2h7zm0-4h-7v-2h7zm0-4H4V8h16z"
          />
        </svg>

        <span>Latest News</span>
      </a>

      <a href="">
        <svg
          class="menu-icon"
          xmlns="http://www.w3.org/2000/svg"
          viewBox="0 0 24 24"
        >
          <path
            fill="#ffbf00"
            d="M17 4c1.1 0 2 .9 2 2v12c0 1.1-.9 2-2 2zM2 20c0 1.1.9 2 2 2h9c1.1 0 2-.9 2-2V4c0-1.1-.9-2-2-2H4c-1.1 0-2 .9-2 2zm19-2c.83 0 1.5-.67 1.5-1.5v-9c0-.83-.67-1.5-1.5-1.5z"
          />
        </svg>

        <span>Web Story</span>
      </a>

      <a href="">
        <svg
          class="menu-icon"
          xmlns="http://www.w3.org/2000/svg"
          viewBox="0 0 24 24"
        >
          <g fill="none">
            <g clip-path="url(#akarIconsWhatsappFill0)">
              <path
                fill="#25d366"
                fill-rule="evenodd"
                d="M17.415 14.382c-.298-.149-1.759-.867-2.031-.967c-.272-.099-.47-.148-.669.15c-.198.297-.767.966-.94 1.164c-.174.199-.347.223-.644.075c-.297-.15-1.255-.463-2.39-1.475c-.883-.788-1.48-1.761-1.653-2.059c-.173-.297-.019-.458.13-.606c.134-.133.297-.347.446-.52c.149-.174.198-.298.297-.497c.1-.198.05-.371-.025-.52c-.074-.149-.668-1.612-.916-2.207c-.241-.579-.486-.5-.668-.51c-.174-.008-.372-.01-.57-.01c-.198 0-.52.074-.792.372c-.273.297-1.04 1.016-1.04 2.479c0 1.462 1.064 2.875 1.213 3.074c.149.198 2.095 3.2 5.076 4.487c.71.306 1.263.489 1.694.625c.712.227 1.36.195 1.872.118c.57-.085 1.758-.719 2.006-1.413c.247-.694.247-1.289.173-1.413c-.074-.124-.272-.198-.57-.347m-5.422 7.403h-.004a9.87 9.87 0 0 1-5.032-1.378l-.36-.214l-3.742.982l.999-3.648l-.235-.374a9.861 9.861 0 0 1-1.511-5.26c.002-5.45 4.436-9.884 9.889-9.884a9.81 9.81 0 0 1 6.988 2.899a9.825 9.825 0 0 1 2.892 6.992c-.002 5.45-4.436 9.885-9.884 9.885m8.412-18.297A11.815 11.815 0 0 0 11.992 0C5.438 0 .102 5.335.1 11.892a11.864 11.864 0 0 0 1.587 5.945L0 24l6.304-1.654a11.881 11.881 0 0 0 5.684 1.448h.005c6.554 0 11.89-5.335 11.892-11.893a11.821 11.821 0 0 0-3.48-8.413"
                clip-rule="evenodd"
              />
            </g>
            <defs>
              <clipPath id="akarIconsWhatsappFill0">
                <path fill="#fff" d="M0 0h24v24H0z" />
              </clipPath>
            </defs>
          </g>
        </svg>

        <span>Whatsapp</span>
      </a>
    </div>
CSS Code:
<style>
      .bottom-menu-bar {
        background-color: white;
        height: 80px;
        padding: 20px 10px;
        position: fixed;
        bottom: 0;
        left: 0;
        right: 0;
        width: 100%;
        display: flex;
        align-items: center;
        justify-content: space-around;
        box-shadow: 0 -2px 10px 0 rgba(0, 0, 0, 0.1);
        box-sizing: border-box;
        z-index: 1000;
      }

      .bottom-menu-bar a {
        display: flex;
        flex-direction: column;
        align-items: center;
        text-decoration: none;
      }

      .bottom-menu-bar a span {
        padding-top: 10px;
        font-size: 14px;
        color: #4f4f4f;
        font-family: inherit;
        box-sizing: border-box;
        word-break: break-all;
        line-height: 1.6;
      }

      .bottom-menu-bar a svg {
        width: 30px;
        height: 30px;
      }

      @media (min-width: 960px) {
        .bottom-menu-bar {
          display: none;
        }
      }
    </style>
How to Add Code to WordPress?
Before adding the code, ensure you insert the relevant links within the href=”” attribute (inside the double quotes) in your HTML. If you’d like to change the SVG icon, simply delete the existing SVG code (from <svg> to </svg>) and replace it with your preferred SVG code.
To add the above code, you can use one of these plugins: Ad Inserter or WPCode Lite. Choose the one that works best for you. Follow the guide below for the installation and setup steps of each plugin.
Using Ad Inserter Plugin:
- First, go to your WordPress dashboard and Navigate to Settings > Ad Inserter.
- Open Ad Inserter Plugin and you will see blocks where you can add the code.
- Copy the HTML code and paste it into a block. Then, copy the CSS code below the HTML code.
- After adding both codes, check the boxes for posts, static pages, homepage, search pages, category pages, and tag/archive pages where you want to display the Sticky Bottom Menu Bar. Be sure to check all the options.
- Scroll down and find the “Insertion” option. Choose the Footer option.
- Finally, click the “Save Settings” button to save your changes.
Using WPCode Lite Plugin:
- Go to your WordPress dashboard and navigate to Code Snippets from the left sidebar.
- Once there, click on the Header & Footer option.
- Scroll down to the footer section, add the HTML code, and click the “Save Changes” button in the top right corner.
- After adding the HTML code, you will see an option labelled “Add Snippet.” Click on it.
- Next, click on the “Add Custom Snippet” button under the “Add Your Custom Code (New Snippet)” section.
- You’ll be asked to choose the type of snippet. Select the CSS snippet.
- Give the snippet a name as per your liking, then copy the CSS code from above and paste it into the snippet area. Make sure to remove <style> & </style> attributes from the top and bottom.
- Finally, activate the snippet by clicking the toggle in the top right corner and save the snippet by clicking the “Save Snippet” button.
I hope this guide helps you easily add an attractive Sticky Bottom Menu Bar to your WordPress website. It’s simple to follow. If you are stuck or have any questions related to this, please feel free to comment below. I will definitely help you.